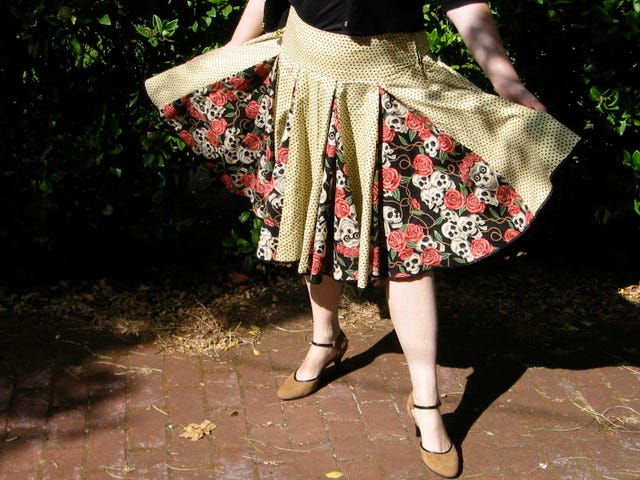
Pirates of the Caribbean Skirt
Ahoy there, Wenches! Only Stitchy Bitches May Apply
I feel pretty; I feel witty; I feel pretty and witty and gay!
I feel like Rita Moreno on the best day she ever had, because I just finished my new skirt. Doesn't it rock?
It actually and swirls and plays hide and seek. My daughter dubbed it "The Pirates of the Caribbean"skirt.
It's gorgeous, the way it moves. It's so seductive and feels like you're in acres of swirl. It takes 6 yards of fabric, 3 for the godets, 3 for everything else.
Below are my sewing instructions, hacking philosophy, and the pattern info.
This is one of those patterns that looks like a total bore on the package cover, but has secret potential.
The Pattern: McCall's M5053 (Flared Skirt)
Pattern Description:
Knee-length flared skirt, with front and back godets. It has a self-lined yoke and side zipper. This is one of these twirl-yourself-around-type skirts.
Pattern Sizing
14-20. My suggestion: make the largest size on the pattern, for maximum oomph in the flare, and then just take in the waist/yoke once you get to that stage.
Did it look like the photo/drawing on the pattern envelope once you were done sewing with it?
No, mine looks fabulous, and theirs is BORING!
The excitement in this skirt is to use a contrasting fabric for the godets, which are just pleats. Look at their Figure A. You can't even tell how great the skirt is, when it's single color like that.
Were the instructions easy to follow?
No. I was fortunate that my sewing teacher, Jill Sanders, made this for herself first, and showed me her quick, and efficient way to construct it.
I will give you her secret key:
All the godets are Pattern Piece (1).
Piece (2) is the CF (Center Front) and CB (Center Back).
The Piece (3)'s and Piece (4)'s are the side bits.
Got that? Now here's the pattern for one side:
4-1-3-1-2-1-3-1-4
Now do that one more time, and put them together.
You have two Piece (4)'s on the side. Leave the left side open for your zipper or buttons.
Pin all the panel seams together, and only THEN, sew them all up.
For your yoke, INTERFACE the facing, which unbelieveably, McCalls doesn’t mention. Insane! You need the strength of interfacing to support the volume of fabric.
Not everything is hard. You don't need to mark the pleat dots on your godets. Eyeballing it is easy. Just bring the sides of the piece into the center, like you were making an accordion envelope.
Sew it down consistently, topstitch those little pleats down about 1½ inches. Yes, TopStitch, you aren't trying to hide it.
Use a matching thread. Mine was black.
Another important tip-- even though McCalls doesn’t mention it, (what is wrong with them?) make a pleat on the sides, those two (4) pieces.
It looks ridiculous not to have a pleat on the sides, so this way, it will look natural and floaty all the way around.
The zipper is a little tricky. Well, when isn’t a zipper tricky?
Here’s my tip:
Do buttons instead. Ha! I mean, you could. You can fasten it anyway you want.
But back to my zipper trick:
You have to fit the bottom half of the zipper into your fake pleat.
I sewed in the top half of the zipper, then stopped, and then began again on the other side, to sew the bottom half.
There was only a stitch or two missing in the middle, which you can ignore or hand sew.
Nifty, eh? This works for every garment you have a difficult zipper placement. Start at both ends and then finish up the middle.
Another thing: how you fix the lining inside the yoke. It needs to be a little baggy, don't pull it taut.
Pin it to the yoke seam, and then stitch-in-the-ditch on the outside.
Give it a good hard pressing on the inside, where you actually press the wrinkles into the bottom of the seam.
It looks wrinkly and baggy on the inside, but looks beautiful and smooth on the outside! I love tricks like that.
I realize that if you're a beginner, my instructions are not helpful enough. It’s a fancy thing. Start with a wrap skirt, an A-line skirt, a column skirt with a tie — they’re so easy, and you can get stylish results that will knock people out.
But if you are an intermediate sewer, you’re relieved to get to the good parts. Yoked skirts are sexy as hell, they are so voluptuous.
The handiest part of my advice is the pattern piece code for pinning, and my insistence on using a contrast godet fabric!
**Are you a fabric slut, a stash fiend, a hand sewn fashionista without apologies?
I ask, because I have a Facebook Stash Fiend group.
I’m getting rid of my entire 90s era fabric vault. It’s time to say goodbye!
Just ask to join if you want in. It is very low-key, but beautiful fabric and great stories about what I was going to make with it.
Fabric Used on Pirate Skirt:
Cotton.
I could have bought more and cut it all properly on the nap, but I didn't.
With 3 yards of my skulls and roses, I had to cut it both length and crosswise to get all the pieces I needed. But it looks fine! If you wanted to be precise with your nap, get 4-5 yards of your contrast fabric.
The cutting is simple, but time-consuming. The pleating and sewing is easy. And hemming is easy but takes a long time to get around those six yards! I used my Bernina hemming foot, even though I’m usually a hand-hemmer.
Speaking of Pirate Booty, here is a knitting pattern for a Pirate Queen Booty Bag. Dammit, I need a stitch-slave!


Those skulls are amazing!